Sunday, January 21, 2018

Adding a 3.5 inch floppy to a Microvax/VaxStation 20000

  A while back, I needed to read some old 3.5 inch floppies. None of the machines here have 3.5 inch floppies on them anymore. The Windows box I have (used only for browsing the web and hosting SIMH) doesn't even have a controller for a floppy anymore.  I got to thinking, and it occurred to me that the controller in a Microvax 2000 that can drive an RX33 (5.25 inch floppy) should be able to drive a 3.5 inch floppy drive - Almost all of the signals are the same, except for some drive select hoodoo.

  I dug an old 3.5 inch floppy drive  out of the junk box and took apart one of the Microvax 2000s  and started to install it. I did't get very far - the connector on the MicroVAX 2000, for the RX33 is a card edge connector. The connector for a 3.5 inch floppy is a normal IDC pin socket sort of affair. Here's a picture of the stock cable. The card edge connector for the floppy drive is the bottom one.
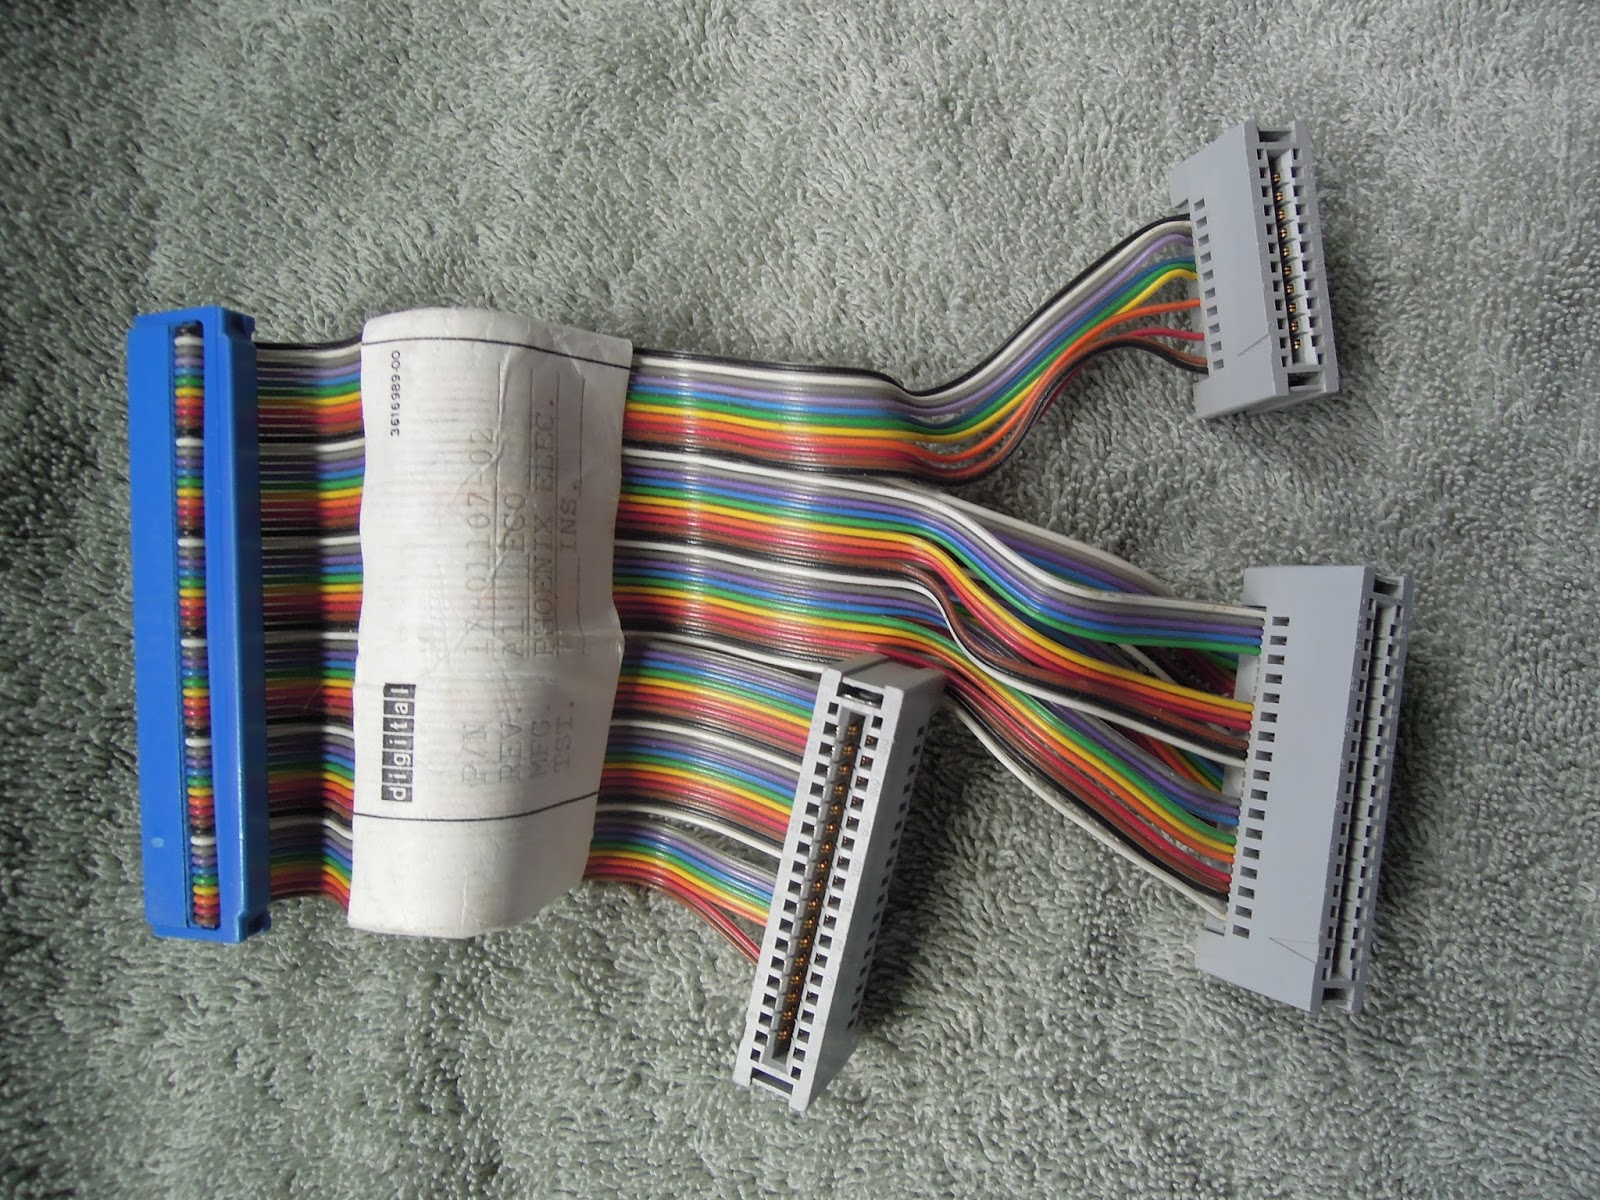


  The cabling for the hard drives and floppy drive on an MV2000 has a 50 pin connector on one end, and three card edge connectors on the other. Two of the card edge connectors are for connecting to an ST506 hard drive. The third section is for the RX33. A little study showed I just needed to cut off the card edge connector for the RX33 and  crimp on a normal IDC pin connector, with the wires attached in the same order as they were on the connector removed. That is, wires 1 and 2 go to pins 1 and 2. Skip pins 3,4,5,6. Connect wires 3,4,5,6,7,8 to the next 6 pins, then skip pins 13 and 14. Then connect the rest of the wires to the rest of the pins, in order. You can see which wires go where and what pins to skip if you look at the existing MV2000 RX33 cable connector - it's card edge connector is pin for pin wired the same as the IDC connector you'll be substituting for it.Here's a stock connector with the floppy edge connector cut off, and the IDC connector that will replace it.


 This worked, but, it didn't leave me a lot of cable slack, which makes putting the thing back together a real  exercise in manual dexterity. I decided to make a complete new cable. This was easy for me, since I am not using an RD series hard disk (I use SCSI for the system disk), so I can leave off the other two cables and connectors.

  So, like I said, the 50 pin connector from the MV2000 is split into three parts. The first part we've been talking about already, the floppy drive part. The other two parts lead to two card edge connectors for the RD series hard drive that MV2000s used for system drives. I didn't need those, so I left them off, and just crimped a 28 pin cable into pins 1 through 28 on the 50 pin connector. If you are still using an RD drive for the system disk, you'll need to add cable for these two connectors, and two card edge connectors as well. Here is my new cable, with the 50 pin connector already connected, and the 34 pin connector that gets crimped on to the other end.


  This picture doesn't show the cable end separated up for the skipped pins yet.

  There's good pinout poop about all this at http://home.iae.nl/users/pb0aia/vax/vs2khw.html. It's got pretty much all the info you need. I've probably muddled things up by trying to explain it...

 OK, maybe all the above is obvious, but it took me several days to figure it out.

  One thing I discovered in this process, is that the convention used on 5.25 inch floppy drivers, and most hard drives, that pin 1 on the interface cable is located nearest to the power connector, does not apply to all 3.5 inch floppy drives. It turned out the floppy drive I was using had pin 1 on the far side from the power connector rather than the near side. You'll know if you get it wrong and plug in backwards - the floppy drive activity LED will come on constantly, and the drive won't work.

  Another tip - in order to work, you have to jumper the floppy drive as DS0. Then it shows up as the third drive, DUA2:. Why? I dunno. Drive select technology for  floppy drives is a long and boring complicated subject, and since I have a solution that works, I choose not to analyze it in depth.

  Alrighty then - that takes care of the hardware. At this point the 3.5 inch floppy drive will show up...as an RX33. That means it will be 1.2 MB in size. An interesting situation, but, since this whole computer rodeo got started because I wanted to read some existing 1.44 MB floppies, not that useful a situation. As well, I'd like to be able to write floppies that other 3.5 inch floppy drives could read, so...not good...

  Not a real problem, though. A little time spent searching Google showed that someone else had already addressed this issue. Way back in 1995, Peter Coghlan wrote some patches to DVDRIVER, the MicroVAX 2000 floppy driver, that take care of this problem. His patches cover VMS versions 5.5-1 and 5.5-2. I'm on VMS 7.3, though. A little study of the device driver and his patches enabled me to find out where to make the corresponding changes in the new version. Peter has given me permission  to post his work on this, with my 7.3 changes added. Here's the file, called PATCHDVDRIVER.TXT. It's a VMS command file - the .TXT extension is required because Google sites is allergic to the .COM file extension.

PATCHDVDRIVER.TXT

    There's lots o' instructions in the file. Basically, save it as a file with the .COM extension, then execute it. It will patch DVDRIVER.EXE to support the floppy as an RX23 instead of an RX33. Reboot, and  Bob's your uncle - you'll see a device DUA2, and it will show up as an RX23, appropriately sized.. 

Saturday, January 20, 2018

Fixes for DISM32 VAX/VMS disassembler

  A couple of weeks back, I had occasion to need to modify DVDRIVER, the VMS device driver that controls floppy drives and ST506 hard drives on MicroVAX/VAXstation 2000s. (see my previous post about 3.5 inch floppies on MV2000s). Peter Coghlan had researched the changes required to make this happen, but his work was for VMS Version 5.5-1 and 5.5-2 - I needed the equivalent mods for VMS 7.3. I needed to find the proper offsets for his changes, in the later VMS version.

  The traditional tool for pulling a driver apart has been DISM32. This utility, written by Andy Pavlin, has been invaluable over the years. It does an incredible job at converting all types of executable files back into MACRO. But, it's an old tool - first written in 1982, and last updated in 1991. It considerably predates VMS 7.3, which is what I'm using.

  I figured, waddahell, let's download it and give it a try. It only took a few minutes Googling to find DISM32 V4.6, the last version, and download it. It came as  a zip file worth of Fortran sources, and a command file to compile and link them all. 

  Right out of the box, it had a problem. The compile failed due to referencing some undefined fields for structure CRFDEF3. A little  research showed that the fields were just FILL positions in the structure. The code wasn't so much using them as checking for a value of 0 - which they should be all the time. So I commented those lines out.

  So, now it compiled, with a slug of informational messages - mostly complaining about unused variables. That didn't bother me - they most likely got added as part of future changes that never got done. It did have a few messages indicating that an unsafe branch  into a loop or block had occurred. That worried me a little more. I checked the indicated spots in the source, and determined that those branches weren't going to cause any problems. So, I tried my freshly linked DISM32 on a few simple executables, and it seemed to still be doing the business.

  Flush with the feeling of success, I gave it a try on DVDRIVER.EXE. No soap - DISM32 blew up and exited after producing only the header part of a MACRO source file. A little more research showed that DISM32 would work fine on some drivers, and blow up on others.

  The error message indicated that a number was overflowing the FORMAT specification (remember FORMAT statements? I barely do...) in a routine that prints out the versions of system libraries that were used.  I increased an I1 spec to an I2, and that problem was over with.

  But, it still didn't complete successfully - now it blew up with a message that indicated that a write to the MACRO output file overflowed its buffer. This error took a little more study, and some time with the debugger. It turned out that the write in question involved the name of the driver, extracted from the Driver Prologue Table. There was support in DISM32 for new style and old style DPTs, which varied in length, and, more importantly, the location of the counted string that holds the driver name. The write statement in question, however, unlike other parts of DISM32 that use the DPT, had not been conditionalized to pick the correct  DPT style - it always used the old style DPT layout . This meant that it wound up using a byte four bytes before the actual counted string, as the length of the name. In this driver, the byte it picked had a large value, so the write failed. In other drivers, that byte happened to contain a smaller value - so those drivers could be decoded successfully.

  I replaced the old style name variable with a variable that would have the correct (old or new) style offset, as required, , and now DISM32 successfully completes.

  On the off chance that there are any other VAX hobbyists out there that need DISM32, I've produced  V4.7, that incorporates the changes described above.

dism32_47.zip

  So, there ya have it...


Friday, December 22, 2017

VAX utility for changing process accounting info.


  One of my VAX sites was an engineering firm that used the computer 
to do work for many different clients. There were often dozens of 
different customers' projects in house at the same time, and some 
of the design engineers were  simultaneously involved with several 
of them.

  The management of this firm needed accounting of computer use broken
down on a project by project basis. VMS provides an accounting
utility, but it is more oriented toward tracking the use of the
computer on an individual user account basis. Each login account has
an account string associated with it, and accounting data is keyed off
of this string. To make use of this accounting in a project oriented 
environment, it would necessary for a user to log out, and log in with
another username (with a different account string in the UAF) to begin
charging activity to another project. 

  Logging out, and then logging in again under another account was an
undesirable solution from just about any standpoint. For one, it takes
time to get logged back in on a busy machine, since process 
creation/image activation is not what VMS is good at. For another, it 
makes use of MAIL and PHONE for office communication next to 
impossible, since you never know what login a person will be using at 
any given time. This solution also was not received very well by the 
user community, and was mostly ignored - people tend to worry more 
about getting the work done rather than logging in and out constantly 
to get the bean counting right.

  To address this need we evaluated several third party VAX/VMS
accounting products, but the quality of the packages was highly
variable. The ones that did perform as advertised were massive
overkill for our needs, being very expensive to purchase, and very
complicated to set up and maintain. We decided to look into
implementing our own form of project accounting, using as much of the
standard VMS accounting environemnt as possible.

  I experimented with the $SNDJBC system service, which enables a
program to write records to the system accounting file. It is easy
enough to use, alright, but what it does is write out "user"
accounting data, which the normal ACCOUNTING command refuses to
report on. This means that you have to write a program to read the
accounting file, find all of your records, and then write reports off
of them. 

  Well, this approach was really starting to smell more like a job for
an application programmer (and that ain't me). I also resented having
my accounting records treated like second class citizens by the
ACCOUNTING utility. In order to avoid having to write a report
program, I started daydreaming about exotic VMS internals type
solutions (as I often do when I am confronted with the prospect of
real work). I realized that all I needed was a little piece of a
normal logout to occur - the part that writes a process termination
message in the accounting file. In like wise, I needed a little part
of a normal login to occur - the part that sets up a new string for
the account, and the fields that record usage for a process zeroed
out. These two functions would be sufficient to change projects
without the hassle of logging out and back in. 

  It took a liitle time sitting in front of the micro fiche reader,
but I found the code that writes the accounting record when a process
terminates. It is done by a KERNEL mode JSB call to an executive
routine called EXE$PRCDELMSG, presumably mnemonic for Process Deletion
Message. I was grateful that this was broken out into a subroutine,
rather than being buried in the body of the process deletion code.

  This routine takes one argument - R5 must contain either 0 or the
address of a block of non paged pool to be deallocated. In this
utility, we have nothing to deallocate, so R5 is cleared before the
call. It is also necessary to set the final status for the process
before you call the subroutine - else the status of the last image to
terminate will go into the accounting record. The status is in the P1
space of a process, at location CTL$GL_FINALSTS. My code just puts an
SS$_NORMAL status there, but if needs be, you could have it store a
status of your own choosing there. This might be useful if you want to
be able to tell a project change from a real process deleteion, for
instance. 

  That took care of the simulated logout. To simulate a fresh login,
accounting wise, I had to find the cells in the process and job data
structures where the accounting information is stored. A look in the
appendices of "VAX/VMS Internals and Data Structures" by Kenah and
Bate was enough to find them. They are listed below. 

  These next five labels are P1 space addresses (NOT offsets)

CTL$GL_VOLUMES number of volumes mounted
CTL$GQ_LOGIN login time, in VMS quadword date format
CTL$T_ACCOUNT process account string 
CTL$GL_WSPEAK peak working set size 
CTL$GL_VIRTPEAK peak virtual page count

  The following label is an offset from the Job Information Block

JIB$T_ACCOUNT Job account string

  The following labels are offsets from the Process Header

PHD$L_IMGCNT count of images this process has activated
PHD$L_CPUTIM cpu time used
PHD$L_PAGEFLTS count of page faults incurred
PHD$L_PGFLTIO count of page fault I/Os performed
PHD$L_DIOCNT number of direct I/Os performed
PHD$L_BIOCNT count of buffered I/Os done


  To simulate a fresh login, all that was necessary was to load the 
account string in the two account fields, and to zero the rest of 
them. The account string fields are not like most of the text fields 
you will find in VMS data structures, in that they are neither counted 
ASCII or descriptor data types - they are just eight characters in a 
row. 

  All that was needed to complete the utility was a user interface, to
allow the users to enter a command to change projects. LIB$GET_FOREIGN
is used to input a new account string. This string is checked for
length, to make sure it is eight characters or less in length. If it
is shorter than eight characters, it is padded with spaces. At my
site, this is sufficient. Some sites will need to add additional
validation of the the input string to make certain that it is a valid
project code, or that this person can charge to it, or whatever. 

  Here's the source for SETACCOUNT.

setaccount.mar

  To use SETACCOUNT, first assemble and link it

$ MAC SETACCOUNT
$ LINK SETACCOUNT /NOTRACE

 For the average run o' the mill users to use this, it has to be installed
with CMKRNL privilege. You'll have to decide for yourself if your site is
OK with this requirement.

$ INSTALL/OPEN/HEAD/SHARE/PRIV=CMKRNL SETACCOUNT.EXE


  Then, define a foreign symbol to invoke it, specifying a command 
name of your choice, and an appropriate directory specification.

$ SETACCOUNT:==$somedisk:[somedir]SETACCOUNT.EXE

  To change projects, simply use the command. If you enter the command 
with no new account string, you will be prompted for one.

$ SETACCOUNT JOB709

$ SETACCOUNT
Enter account string...>DIREWOLF

  If the string entered is too long, an error message is printed, and
no accounting information is altered.

$ SETACCOUNT THISISWAYWAYTOOLONG
LIB-F-INPSTRTRU,input string truncated


  After each execution of the command, a new accounting record will be
written. The ACCOUNTING utility is then usable to produce reports by
project. I should point out that the SETACCOUNT utility will not
change the accounting information of any subprocesses that are in
existence when the utility is invoked. All subprocesses created after
the use of the SETACCOUNT command will, however, inherit the current
correct accounting information (they will acquire it from the
JIB$T_ACCOUNT field in the Job Information Block). If your site has
applications that use a lot of subprocesses that are created early
on and don't terminate until logout, then this utility might not be
appropriate for you. Enabling the change of all subprocesses of a
process when the SETACCOUNT command is issued is a little more
involved (it involves queueing AST's to other processes), and was
more of a solution than we needed.

Thursday, December 21, 2017

VMS Binary File Editor

A long long time ago, when the Earth was young, and we rode our 
dinosaurs to work every morning, I worked as a system manager at a large 
VAX site. It was around 1986 and we had a pretty large cluster, that we
used, along with some other local VAXes, to support around 8,000 engineers
and office workers all over the world. 

  One day, I got a call form the folks that managed the accounts on the
system. They allowed as to how they were getting errors when they tried to
add any new accounts to the UAF. Next, the Help Desk called to relate that
lots of people couldn't log in anymore. I found this...alarming. A little
checking soon revealed that the UAF was corrupt. It apparently had a bad
block in the middle of it, and RMS was not well pleased when it tried to
read it. 

  I tried the usual RMS fixes. First, on the theory that maybe the bad
block was in the middle of a secondary index, I tried to convert the file
to a sequential file, and, if that had worked with no errors, I could have
then converted it back to an indexed file, with no loss of data. No soap -
it couldn't successfully convert to a sequential file. 

  I thought about the old RMS trick of "patching" around the bad bucket.
That can make an RMS file readable again, but, had a pretty good chance of
losing some records. Losing random records out of the UAF did not appeal
to me as a solution.

  I considered restoring from backup, but, the backup had been done 
Friday, and it was Monday afternoon now - it was a busy place and a lot
of work had been done since then (at the time, the sun never set on this 
engineering firm). Accounts had been added and deleted, Identifiers had
been granted  and revoked, last login times updated, passwords changed -
well, you know how it is - lots of changes. 

  Using the backup would have been a very large pain in the sitz-platz. 
But I got to thinking - a lot of the UAF doesn't change all that much from 
day to day - the odds were good that the bad block, be it a user record or 
a piece of metadata,  had occurred in a spot that hadn't changed since
the last backup. Finding what block was bad was trivial - I DUMPed the
file and it keeled over and told me when it hit the bad block. Then I used
DUMP to DUMP all the rest of the file starting after that block, to make
sure only one block was bad. All I needed then was a program to read that
block out of the UAF from the Friday backup, and update it into the current
production one, writing over the bad one (well, bad block relocation would
take place, but I wasn't worried about that low level for this problem -
functionally, the bad block got overwritten). 

  So....that's what I did. I wrote a block IO program that read block
number X out of the good backup file, and updated it into block X of the
bad production file. I held my breath and did a CONVERT...it succeeded. A
little testing with UAF showed it was all good to go now - the failures
the accounts folks were seeing didn't happen anymore. All of the hard 
working engineers and office workers could log in again. The phones didn't 
ring off the wall with people asking what happened to the changes from the
last three days. All was well again in Whoville and the phone stopped
ringing. 

  But the whole mess made me think that I ought to have a utility on hand 
and ready to go that could easily read, write, edit and block copy data
around for any future situations such as the above - something a little
more general purpose than the fixup program I used that time. I also had
need of a utility that could do binary edits on files, that was easier to
use than PATCH/ABSOLUTE. 

  ZAP was that program. I named it after the famous RSX11 ZAP program, 
that was a brilliant hack that turned ODT in RSX into a file editor with 
the addition of just a few lines of code.

  ZAP will let you edit files character by character, in hex or ASCII. It 
will allow you to copy blocks around inside a file, as well as copy a 
block or blocks from one file and write them into another file. ZAP is one 
of a very few programs I wrote in Fortran instead of Mcaro-32, so, by 
happy coincidence, it is also one of the very few programs I have written 
that will fork on Alphas (and likely Itaniums, although I haven't tested it 
one one) as well as VAXes.

  Here's the sources for ZAP

build.txt

zap.for

screen_init

ufo.for

read.for

write.for

format_line

fresh.for

  To build...

Rename build.txt to build.com (Google sites won't let me upload a file
with the extension of ".com"...) and the execute it.

$ rename build.txt build.com
$ @build

  To use

$ zap :== $disk:[directory]zap.exe
$ zap somefiletozap.ext

   Or, just run zap

$ run zap
  And you will be prompted for what file you want to edit.


  The leftmost panel in ZAP has a command summary. Here's what a ZAP
session looks like. 


And here it is in ASCII mode


  Basically, in any block, use the cursor keys to move around. When you
reach the bottom or top of the screen, the block will scroll up or down as
needed within the current block. It will not scroll into next block. To
change a value, position on it, then enter the new value. If you are in
HEX mode, and want to enter a new value, entry must be two digits (leading
zeros are required. To write any changes you make to the file, press the
DO key or GOLD-W before leaving the block (several functions have two key
sequences that can perform them, since not all keyboards have DO, Select,
and other DEC terminal specific keys). Note that the hex mode display is formatted
like a VMS dump  - the lower addresses are on the right, increasing as you go
to the left. ASCII mode is like text, it goes from left to right.  Blocks that are copied
go into a temporary file, so you can copy blocks from a file, close that session,
start ZAP on another file, and past those blocks into it.

Tuesday, December 19, 2017

VAX utility for changing page protection on pages in system space.


  Back in the day, I was involved in a project that needed to make a small 
routine located in non-paged pool accessible from all processes on a
system. The problem was, that  non-paged pool pages are protected at
ERKW - Exec Read, Kernel write. My routine needed to execute in User mode,
and thus could not work in those pages. I needed a routine to alter the
protection of the pages that the code resided in.
  
  I wrote a little utility that would allow me to examing and change page
protection settings from DCL. It's a simple thing, really - it gets a
command line, parses it with TPARSE, and then looks up the existing page
protection in its PTE. If a new protection was specified on the command
line, it is updated. If not, it just prints out the existing value. 

  The syntax is simple...

  Print the page protection for an address.

$ aprt 81000000
Page 81000000 protection = URKW 

  Print the page protections for the pages beteen address1 and address2

$ aprt 81000000:81000400
Page 81000000 protection = URKW
Page 81000200 protection = URKW
Page 81000400 protection = URKW 

  To modify a page...

$ aprt 81000000/prot=urew

Page 81000000 protection = URKW 


   To modify a range of pages...

$ aprt 81000000:81000400/prot=urew

Page 81000000 protection = URKW  
Page 81000200 protection = URKW  
Page 81000400 protection = URKW 

Note that the protection listed is the protection BEFORE the change is 
applied


  The page protection can have values of...

NA                   ;no access
RESERVED    ;invalid protection - never used
KW                  ;kernel write
KR                   ;kernel read
UW                  ;user write
EW                  ;executive write
ERKW             ;exec read kernel write
ER                   ;exec read
SW                  ;supervisor write
SREW             ;supervisor read exec write
SRKW             ;supervisor read kernel write(bet this is never used)
SR                   ;supervisor read
URSW             ;user read supervisor write
UREW             ;user read exec write
URKW             ;user read kernel write
UR                   ;user read

  Now, I gotta warn ya - this utility is intended for people who know what 
they are doing. You can jam up your system mighty quick if you set page 
protections "funny". I would be particularly cautious about changing the 
protection of pages that don't have write access to having it - I'm not 
sure what backing store would get used if the page faulted.... so proceed 
with caution...and as always, proceed at your own risk.

  Here's aprt.mar

APRT.MAR

  To build the program...
$ mac aprt
$ link aprt
$ aprt :==$disk[directory]aprt.exe

  You need to substitute the disk and directory spec where aprt.exe is located.

Wednesday, September 20, 2017

Utilities to alter Files-11 attributes on VMS and RSX


  Files on most systems these days are just a bag of bytes. Just bytes in 
a row, maybe with an occasional Carriage Return and/or Line Feed character
thrown in to provide some sort of notion of records or readability. 

  That's not the way RSX and VMS did things. Bytes are stored in a file, 
sure enough, but files have metadata associated with them (and often extra
bytes in the file as well) to support the concept of records. Several
types of records are supported - undefined, variable length, fixed size,
and like that. Carriage control for records isn't totally left to embedded
CR/LFs - it too is an attribute, supporting None, Fortran style, printer
control style, or implied (if you are displaying the file, a CR/LF gets
automatically displayed on output). VMS/RSX also have varying levels of
support for files with different sorts of random and keyed access built in
- sequential, relative and indexed. Interestingly enough, the system
definitions indicate that there was thought of adding a Hashed file type,
but it was never developed. 

  One thing is pretty certain - when a file gets transferred to/from a VMS 
or RSX system and one of these other types of systems, something is going 
to get hurt. Record lengths, types and carriage control are almost certain 
to go wrong or go away in the process.

  I wrote the ICONV utility back in 1988 to deal with this on VMS. Since 
then, VMS has added a SET FILE /ATTRIBUTE command to deal with these 
problems, so I  only occasionally have to use ICONV, when working on older 
versions of VMS. These days, I work a lot more on RSX than VMS, so I
recently coded up a version of ICONV for RSX to help fix transfer damage
there. 


iconv.mac

  To build the RSX version of ICONV
>mac iconv=iconv
>tkb
TKB>iconv=iconv
TKB>/
Enter Options:
TASK=...ICV
//

  To use...
>INS ICONV
or
run iconv
ICV>file /sw:val /sw:val

 Switches are:
 /HE prints this help text
 /LI prints the file attributes
 /VE prints out program version
 /ORG:val values are SEQUENTIAL, RELATIVE, INDEXED, or HASHED
 /REC:val values are UNDEFINED,FIXED, VARIABLE, SEQUENCED or STREAM
 /CC:val  values are NONE, FORTRAN, CARRIAGE_RETURN or PRINT
 /BLK or -/BLK - sets or clears the "records can't span
    blocks" flag
 /MRS:val value is decimal size of maximum record size
 /RSZ:val value is decimal size of records

  Like I said above, ICONV for VMS is useful only on older VMS systems, 
but, waddahell, I'm including it here in case someone needs to adjust 
attributes on an old VAX somewhere. It's also a middlin' good example of 
how to use TPARSE, and how to programmatically change file attributes.

iconv.mar

iconv.hlp

  To build...

$ mac iconv
$ link iconv
$ iconv :== $diskx:[diry]iconv.exe

then,

$ iconv z.tmp/type=fixed  etc...

or $ iconv
or $ run iconv
Yes?>

to be prompted for the command line.

  If you want to use the built in help in ICONV, build the help library

$ libr/create/help iconv.hlb
$ libr/insert iconv.hlb iconv.hlp


 Then define a logical ICONV_HELP to point to the location of the HLB file

$ def/system iconv_help dua0:[somwdir]

 The help info is invoked by, logically enough the help command

$ iconv help                                         

ICONV

    This is ICONV, a program for changing the attributes of a file.
    Use at your own risk - this is serious business.

    Format:


      ICONV input-file-spec


  Additional information available:

  Parameters Command_Qualifiers
  /TYPE      /ORG       /CC        /SPAN      /RSIZE     /VFCSIZE   
/MAXREC
  /CREDATE   /BAKDATE   /REVDATE   /EXPDATE

ICONV Subtopic?

  Regarding both of these versions of ICONV...you are assumed to know what 
you're doing...either one of them could be used to scramble up a file's 
attributes pretty thoroughly...so be careful...

Sunday, August 13, 2017

Utility to read RX50 Teledisk images on RSX systems


The DEC RX50. Has there ever been a more disliked peripheral in the DEC world? Well, of course there has - the TK50. But we're talking about the RX50 today.

  The RX50 is a dual 5-1/4 inch floppy drive that found its way on to a lot of DEC gear in the 80s. RX50s were used on the DEC Professional computers (325s, 350s and 380s), on DECMates and on lots of smaller PDP11 and VAX systems.

  A lot of software from that era (including a lot of software for DEC machines on RX50s) wound up being archived by a program called "Teledisk". Teledisk was a pretty capable utility for saving floppies to files. It had a lot of bells and whistles for preserving all sorts of arcane floppy formats and hardware quirks. Teledisk is no longer sold or maintained, and the old versions you can find on the web run only under DOS on slow PCs (and, I hear, assorted emulators).

  I occasionally run across RX50 images that have been preserved via Teledisk (usually, files with extension .td0 are Teledisk images).  Not all of these are available elsewhere as simpler images. I could have gotten an old version of Teledisk and an old PC or emulator - but, I'm DEC blue through and through - I'd rather eat a spoonful of dirt than use a solution like that.

  Instead, I wrote an RSX utility that can read Teledisk images of RX50s and write them out as a disk image in LBN format - the format used by VCP (the RSX virtual disk program), LD disks on VMS,  and simh virtual disks. It can also write the image in track and sector order, if you have need of that.

  RTD (for ReadTeleDisk) is written to work only with RX50 images, and has only been tested with RX50s that had a Files-11 (that is, RSX or VMS) file structure. If anyone needs support for something else let me know and I'll add it in the next version.

  Note - I just found out that there is an "advanced" version of teledisk, that produced file images of RX50s that RTD can't read. I'm working on a new version than can read these advanced images.

RTD.MAC

To make...
mac rtd=rtd
tkb
TKB>rtd=rtd
TKB>/
Enter Options:
TASK=...RTD
//

To use...
>run rtd
RTD>outfile=infile
or install it
>ins rtd
>RTD outfile=infile
outfile extension defaults to .dsk, infile extension to .td0

Switches are /LBN and /TS. /LBN is the default and outputs the dsk file in logical block order. /TS outputs in ascending track, sector order. /LBN is the default because that's what you'll want to use the dsk file as a simh virtual disk or a VCP virtual disk. /TS order is for...I don't know what it's for. Can't think of any use for it, but, I included in case it's ever needed.

  So, you copy your .td0 image file to your RSX system (via DECnet, FTP binary, or whatever). You use RTD to create the DSK file, and then mount and read it using VCP or simh. What could be simpler?

 The info about the format of the teledisk file I needed to write this utility was found in an article by Dave Dunfield, at http://www.classiccmp.org/dunfield/img54306/teledisk.htm.